Transistor » Testing transistor
Testing a transistor
Following contents are taken from Vetco Electronics
Remove the transistor from the circuit for accurate test results.
Step 1: (Base to Emitter)
Hook the positive lead from the multimeter to the to the BASE (B) of the transistor. Hook the negative meter lead to the EMITTER (E) of the transistor. For a good NPN transistor, the meter should show a voltage drop between 0.45V and 0.9V. If you are testing PNP transistor, you should see “OL” (Over Limit).
Step 2: (Base to Collector)
Keep the positive lead on the BASE (B) and place the negative lead to the COLLECTOR (C).
For an good NPN transistor, the meter should show a voltage drop between 0.45V and 0.9V. If you are testing PNP transistor, you should see “OL” (Over Limit).
Step 3: (Emitter to Base)
Hook the positive lead from the multimeter to the to the EMITTER (E) of the transistor. Hook the negative meter lead to the BASE (B) of the transistor.
For an good NPN transistor, you should see “OL” (Over Limit).If you are testing PNP transistor, the meter should show a voltage drop between 0.45V and 0.9V.
Step 4: (Collector to Base)
Hook the positive lead from the multimeter to the to the COLLECTOR (C) of the transistor. Hook the negative meter lead to the BASE (B) of the transistor.
For an good NPN transistor, you should see “OL” (Over Limit).If you are testing PNP transistor, the meter should show a voltage drop between 0.45V and 0.9V.
Step 5: (Collector to Emitter)
Hook the positive meter lead to the COLLECTOR (C) and the negative meter lead to the EMITTER (E) – A good NPN or PNP transistor will read “OL”/Over Limit on the meter. Swap the leads (Positive to Emitter and Negative to Collector) – Once again, a good NPN or PNP transistor should read “OL”.
If your bipolar transistor measures contrary to these steps, consider it to be bad.
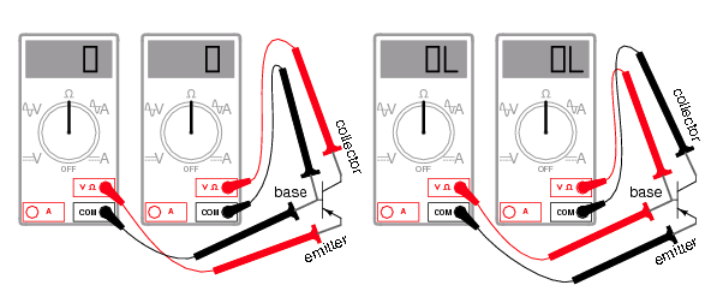
Image source: all about circuits